Are you bored with your current Christmas tree?
Seeing the same tree every year with the same decorations can be unexciting.
Why not make your own?
Creating your own unique Christmas tree means you can craft one that is the perfect size for your living space or you can make one to decorate a different spot in your home to make it a little bit more Christmassy.
It can be fun, especially if you’re doing it together with your children.
Plus, it’s a great way to go green this Christmas.
Here are some DIY crafts ideas that you can choose for your home!
1. Plastic spoons arranged into tree shapes
DIY Project Details: oneprojectcloser.com
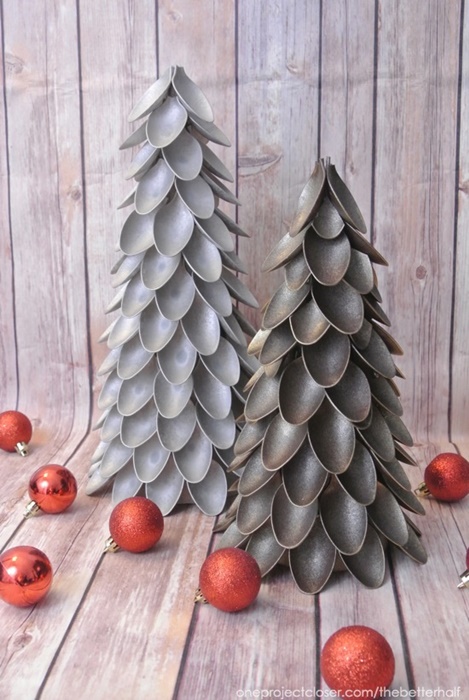
Materials Needed:
- Paper Mache Christmas Tree form
- 100 or more plastic spoons
- Spray Paint
- Hot Glue
How to do:


- Cut the tops off or you can try to break the top of the spoons.
- Laid them outside on paper face down and sprayed them with a variety of different spray paints of your choice of colours.
- After they were all dry, begin gluing them onto the paper mache from starting at the bottom using hot glue.
- Vary the spacing on the different layers so that the spoons alternated on the layers. And keep on working your way up to the top till it is done! Super EASY!!
2. Christmas Tree Cones with Ribbon
DIY Project Details: fynesdesigns.com

Materials Needed:
- Kitchen funnels (different shapes and sizes)
- Styrofoam ball
- Ruffle ribbons
- Empty ribbon spool
- Hot glue
- Spray paint
How to do:


- Stack the kitchen funnels into a tree shape (from the biggest to the smallest in the top)
- To stabilize these DIY Christmas tree cones – push a small styrofoam ball over the tip
- Glue the next smallest on top
- Give the base of your tree a little lift – just spray paint an empty ribbon spool.
- Now, glue the ribbon around the cones.
- Finally, decorate it with beads, or a string of lights.
3. Creative Wall Mounted Christmas Tree
DIY Project Details: engineeryourspace.com

Materials Needed:
- Long green Christmas garland (3 x 9ft)
- Glue dots hang tabs
- Painter’s tape
How to do:


- Mark the outline of the tree on the wall using painter’s tape.
- Take the hang tabs, slide the end of the garland through the perforated holes of the tab, remove the backing and then stick the tab to the wall, at the top of the triangle.
- Repeat the process, first going around the outline of the triangle and then filling in the middle of the tree. Fluffing up the garland to fill in any blank spaces.
- Decorate your tree with lights and ornaments.
4. Tomato Cage Christmas Tree
DIY Project Details: nedesignbuild.com

Materials Needed:
- Garden tomato cage – from 3 to 6 feet or more, (you can find tomato cages very easily in any kind of home improvement stores)
- A pot
- Metal wires or old cloth hangers
- Christmas garland
How to do:


- Take the tomato cage and flip it upside down, you notice it already starts to look like a tree itself.
- Place it into a pot with soil to give it more of a traditional look, or you can just leave it as it is.
- Use some metal wires or old cloth hangers and bend some pieces to secure the cage in.
- Wrap the garland around in a spiral motion to cover each and every part of the cage.
- Then decorate it with some Christmas lights and ornaments.
5. DIY Wood Slice Christmas Tree
DIY Project Details: hometalk.com
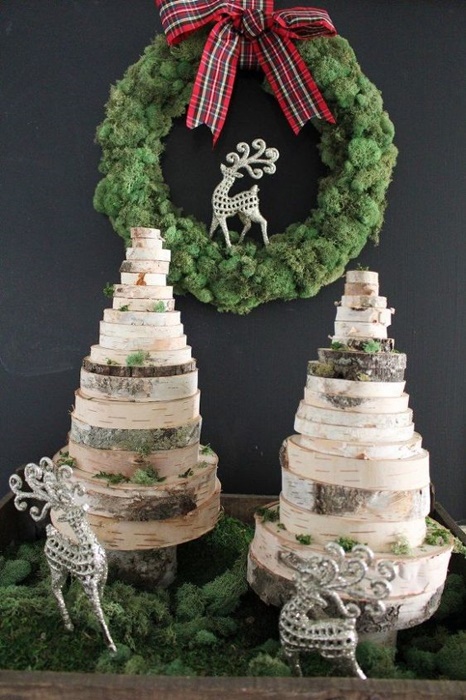
Materials Needed:
- Wood slices from biggest to the smallest in sizes
- Sheet moss & reindeer moss
- Wooden box
How to do:


- Layering the slices and adding more or taking some away until you get the shape you wanted – use a thick base as the tree trunk to make it sturdier.
- Use sheet moss on the bottom and then added reindeer moss to give it more depth.
- You can add any decors to add some sparkle.
- Use a wooden box as a base.
6. Tiny Moss Christmas Tree Idea
DIY Project Details: lilluna.com

Materials Needed:
- Moss
- Pail
- Hot glue
- Styrofoam cone and square
- Tree twig
- Mini pom pom trim
How to do:
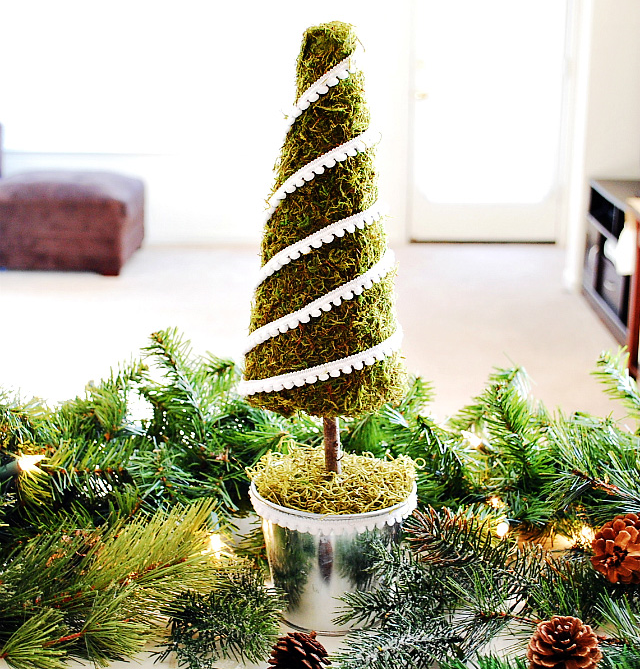
- Begin by gluing the Styrofoam square inside the pail.
- Use adhesive moss sheets to cover the cone but use a little hot glue to secure the seams.
- For the tree “stump” use a twig which gave it a realistic look.
- It was a little bare so that’s where the pom-pom trim came into play. Add a little bit of loose moss at the base finished off the project.
7. Simple DIY Glitter Christmas Tree
DIY Project Details: balancinghome.com

Materials Needed:
- Plastic cones
- Mod podge/ Glue
- Glitter
- Spray
How to do:

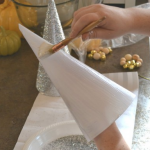
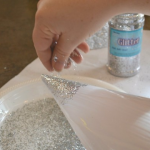
- Apply glue on the surface of the plastic cones.
- Sprinkle glitter all over it.
- Spray the trees to help keep the glitter in place.