Valentine’s Day is coming and you need some great backdrop or indoor decorations to create a romantic ambiance for your loved ones.
Since spending more time indoors is the new norm, how about polishing up your creative side by transforming your home into a romantic nook with this perfect combination of modern and beautiful DIY crafts ideas.
1. Heart Marquee Sign
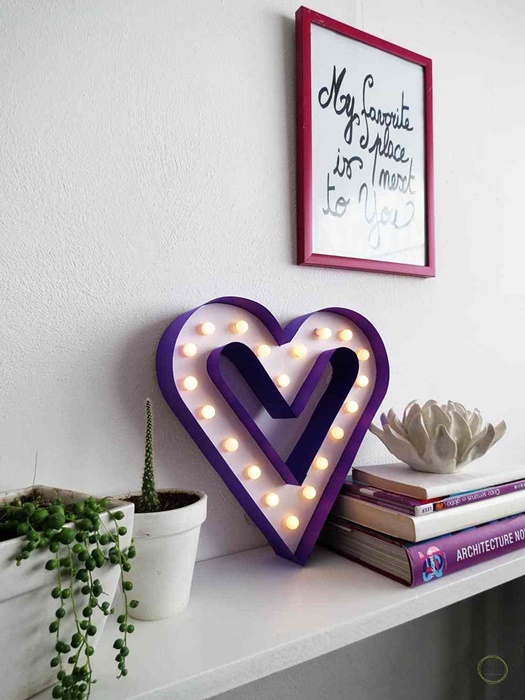
Tutorial by Oh Oh Deco
Materials needed:
- white cardboard
- a thick color paper
- LED cord-light with 20 lights
- Scissors
- cutter
- Ruler
- Pencil
- A glue gun or silicone glue
- The free template, which you can download on ohohdeco.com
Directions:


- You first need to download and print the PDF heart template. It comes in two parts, so cut along the dotted line and glue both sheets of paper together with some tape.
- Report the heart shape and the small circles on the cardboard. Cut the cardboard, if you wonder, the little circles mark the place of every LED light. So you need to cut them out too. Take a sheet of colored paper and cut two strips of 2 inches width by 18 inches long.
- You will use the paper strips to make the edges of the marquee sign. Glue the paper on the edge of the cardboard, starting from the heart tip.
- Apply very little glue at the time to prevent the glue from overflowing. If some area requires more glue you can add an extra dot on the backside. I worked with a glue gun, but silicone glue is also a good option.
- Once the first strip is glued, continue with the second one. Before gluing you can trace a line lengthwise to mark the strip center, so you just have to apply the glue on the line and you will be sure the strips are glued straight.
- Once all the edges are covered with the paper, you can trim the extra length if necessary.
- Cut 2 more strips to cover the inside edge of the heart. You have to do the same to cover the heart center.
- Take off the little bulbs from the LED lights and push them into the cardboard holes then, from the back of the marquee sign, put back the LED into the bulbs.
- Light the cord and DONE! Enjoy you lovely Marquee Sign! It’s a nice Valentine’s day detail that you may want to keep around even passed February!
2. Origami Heart Bouquet

Tutorial by Design Improvised
Materials needed:
- Origami paper
- 20 gauge florist wire
- Wire cutters
- Scotch tape
- Faux greenery
- Florist foam
- Vase
Directions:


- Make around 10 paper origami hearts with a variety of pink, purple, and red origami paper. Highly recommend you refer to this simple paper heart tutorial on YouTube. It moves you through the heart step-by-step process slowly so you quickly pick up the technique and can easily replicate it to make more flowers.
- Each heart will contain a little pocket opening in the back. This is where you will insert the flower stem.
- Cut a piece of florist wire in half with wire cutters. Poke the wire into the backside opening of the heart and through the base of the heart. Secure the top of the stem to the back of the heart with a small piece of tape.
- Continue making more flowers. You can vary the length of the florist wire to give the flowers different heights in the arrangement if you want.
- Add a piece of florist foam to the base of a vase. If you like this painted mason jar vase, be sure to check out my simple tutorial on how to paint the inside of a vase!
- Fill the vase with the flowers and some faux greenery. You’re done!
3. Love Letter Banner
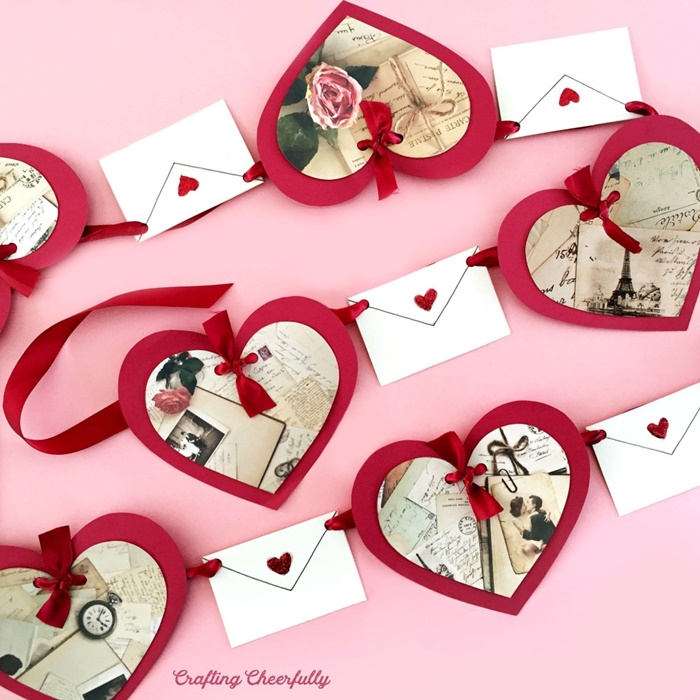
Tutorial by Crafting Cheerfully
Materials needed:
- Free printable template: Love Letter Valentine’s Banner
- Red and white cardstock or construction paper
- Images of vintage love letters.
- Cut out images from magazines or newspapers
- Check scrapbook paper.
- Purchase images from Shutterstock, Creative Market or other image sites
- Find free vintage images at sites like The Graphics Fairy
- Ribbon
- Red glitter
- Thin black Sharpie or marker
- Hole punch
- Scissors
Directions:


- Download and print the free template and cut out the banner shapes. First, cut the large hearts out of red paper. Cut smaller hearts from your decorative paper or images and then glue them to the larger red hearts. Use white paper to cut the envelopes.
- Punch two holes near the center of each heart through both layers.
- Start by drawing a “V” with a thin black marker or Sharpie to make the envelope flap. Draw a small heart in the center and then fill it in with red glitter. Punch two holes, one on either side of the envelope.
- String the banner together, alternating between heart and envelope.
- The banner is finished!
4. 3D Heart Flower Wreath

Tutorial by White House Crafts
Materials needed:
- Card stock in medium and light pink, light and dark green
- 2 1/2″ heart punch
- 2 1/2″ circle punch
- crafter’s tape
- 12″ floral craft ring
- Hot glue gun
Directions:


- With the heart punch, cut shapes in both pinks and score them all in half. Tape three hearts of similar colour together to create a 3D shape, leaving one side flat. In total you’ll need about 12 to 13 flowers (so that’s about 36 to 39 hearts).
- Use the circle punch to make the leaves. From one circle shape, you can get two leaves out of it by inserting it back into the punch to make ellipses. Then score each leaf down the middle. You will need approximately 42 to 45 leaves.
- Start by hot gluing all the leaves around the craft ring in groups of three or more. Then attach a heart “flower” on top.
- Cover the entire ring this way, trying your best to attach the flowers in an upright position all the way around. In the end, you’ll be left with a beautiful product!
5. Conversation Heart Tassel Charms

Tutorial by Studio DIY
Materials needed:
- One Sheet of Felt
- One Sheet of Felt in a Contrasting Color (For letters, if making!)
- Embroidery Floss (To Match Felt)
- Yarn in Two Colors
- Stuffing
- Pom Pom Maker (Or pre-made pom poms)
- Large Embroidery or Yarn Needle
- Scissors
- Hot Glue Gun
Directions:


- Fold your sheet of felt in half and cut out a heart shape, through both layers so you’ll have two total hearts.
- Use a blanket stitch to stitch around the edge of the heart, leaving about a two-inch opening for stuffing.
- Stuff the heart as full as desired and then stitch the opening closed using the same blanket stitch.
- Make a small pom pom, about 1.5-2″ using your pom pom maker.
- Make a tassel. The easiest way to do this is to wrap yarn around and around either something like a piece of cardboard or between your hand and elbow. Slip the loops of yarn off wherever you wrapped them and tie a small piece of yarn around the center. Use that new piece of yarn to fold the tassel in half. Trim the loops at the ends and trim all the ends until they’re even.
- Thread a piece of embroidery thread through your needle and stitch it up through the tassel, the pom pom, and into the bottom of the heart. Tie with a knot and trim.
- Cut out letters to spell your desired phrase and hot glue them to the heart.
- Take a small piece of yarn and stitch or loop it through the top of the heart. Tie a knot in it and you have a way to hang your charm!